快速上手 NextJS v13 - 基礎觀念 AppRouter 篇
前言
Hi 大家好,我是 Johnny,這陣子公司同事開始接觸到 Next13 相關的開發,覺得我也是時候來研究下,索性花了幾個小時快速體驗了一下,並將一些我覺得比較重要的特點記錄下來,這篇是我速讀 Next13 官方文件後整理的一個隨性筆記!主要包含 基礎觀念, AppRouter 的規則等等,Data Fetching 會再出一篇介紹,本篇主要專注在 Next13 的新功能、觀念上面。
筆者撰寫文章時 NextJS 版本為
v13.4.4
首先 NextJS v13 究竟做了啥?
先簡單總結幾個最大的特點
初始化 0 配置,讓新手也能專注在理解 NextJS 的資料夾結構、概念,而不是浪費時間在一堆非必要的初始設定、配置- 新的
App Router 模式,提供高度客製化 Routing 的能力 Server Component 模式及相關好用 API,提供開發前端程式時的資料處理安全性、SEO 優化能力、以及盡可能地減少 client side 消耗的處理效能Server-Centric routing快速反應路由切換,Router 內建in-memory client-side cache機制,避免不必要的頁面內容 reload 影響效能
以上是我目前對於 NextJS v13 的一點理解,下面就來實際看看程式碼吧!
初始化 0 配置
透過 yarn create next-app 快速建立新的 NextApp,點開 next.config.js 只有下面這樣,對於新用戶來說可以完全忽略這個 config 設定部分!雖然後期開發一定會需要調整,但在初期建立專案或新手來說非常方便。
/** @type {import('next').NextConfig} */
const nextConfig = {}

module.exports = nextConfig
Server Component VS Client Component
預設為 Server Component,可透過在檔案最上方定義 use client, use server 明確設定
// 預設其實就是 use server,除了 error handling component
'use server';

import Image from 'next/image'

export default function Home() {
  return (<div>Hello Home</div>);
}
如果在 server component 中使用像是 useEffect, useState 等 client side only 的 hook 將會報錯
ReactServerComponentsError:
You're importing a component that needs useState. It only works in a Client Component but none of its parents are marked with "use client", so they're Server Components by default.
想要像原本 Pages Router 方式撰寫 client side component 可以這樣寫
'use client';

import Image from 'next/image';

// 下面就是 Pages Router 方式的原本寫法,這裡省略 =V=
When to use Server and Client Components?
具體何時該使用 server component, client component 可參考官方網站
底下是一個根據官網資訊製作的簡單對照表格,僅供參考
| What do you need to do? | Server Component | Client Component |
|---|---|---|
| Fetch data | ✅ | ❌ |
| Access backend resources (directly) | ✅ | ❌ |
| Keep sensitive information on the server (access tokens, API keys, etc) | ✅ | ❌ |
| Keep large dependencies on the server / Reduce client-side JavaScript | ✅ | ❌ |
| Add interactivity and event listeners (onClick(), onChange(), etc) | ❌ | ✅ |
| Use State and Lifecycle Effects (useState(), useReducer(), useEffect(), etc) | ❌ | ✅ |
| Use browser-only APIs | ❌ | ✅ |
| Use custom hooks that depend on state, effects, or browser-only APIs | ❌ | ✅ |
| Use React Class components | ❌ | ✅ |
什麼是 App Router?
App Router 是 v13 新介紹的一種 routing 方式,與之相對過去的方式被稱作 Pages Router,可以在官方網站左側按鈕切換兩種路由模式的 Documentation
為求說明方便,底下內容皆以 Typescript 進行說明,
App Router簡稱A.R,Pages Router簡稱P.R
首先了解一下一個概念,比較好理解後面提到的東西:
P.R: 以File為單位定義頁面,該頁面相關設定必須放在外部管理、引入,較難客製化A.R: 以Folder為單位定義頁面,該頁面所有相關設定可直接放在 folder 層級中,可高度客製化
app 資料夾裡都裝什麼?
A.R 方式在 app 資料夾中主要可以使用以下幾種 NextJS 會進行處理的文件
page.tsx: 定義當前層級頁面(與route.tsx不可同時存在同一層中)route.tsx: 定義當前層級 route handler(類似P.R方式時的pages/api/xxx.tsx)
layout.tsx: 定義當前層級與子層共享的 UI 版型(若父層有 layout,會被父層 layout 包裹起來)template.tsx: 與layout類似,但在路由切換時會 remount 新的 instance(layout若路由切換前後一樣,則相同部分不會被 remount 新 instance)
loading.tsx: 定義當前層級頁面與子層的 loading UIerror.tsx: 定義當前層級頁面與子層的 error UI(不會 catch 同一層的layout.tsx錯誤,需要 catchlayout.tsx錯誤需要在上一層級的error.tsx中處理,若為rootLayout,則請在global-error.tsx中處理)global-error.tsx: 與error.tsx基本相同,但主要用來定義處理rootLayout的錯誤
not-found.tsx: 定義當 component 中呼叫notFound方法或是匹配不到任何頁面時的 UI
以上檔案在各層中會反覆出現,並不是只有一層喔!~除了以上基本的檔案名稱外,可以參考這邊查看其他會被 NextJS 處理的檔案名稱,除了這些檔案名稱外的檔案可以安心放在裡面自由運用
Page 定義基本頁面
以下兩種模式分別建立路徑 /, /about 的頁面,Dynamic Routing 機制可參考這邊
P.R:pages/index.tsx,pages/about.tsxA.R:app/page.tsx,app/about/page.tsx
// `app/page.tsx` is the UI for the `/` URL
export default function Page() {
  return <h1>Hello, Home page!</h1>;
}
下圖是 Nested Routing 範例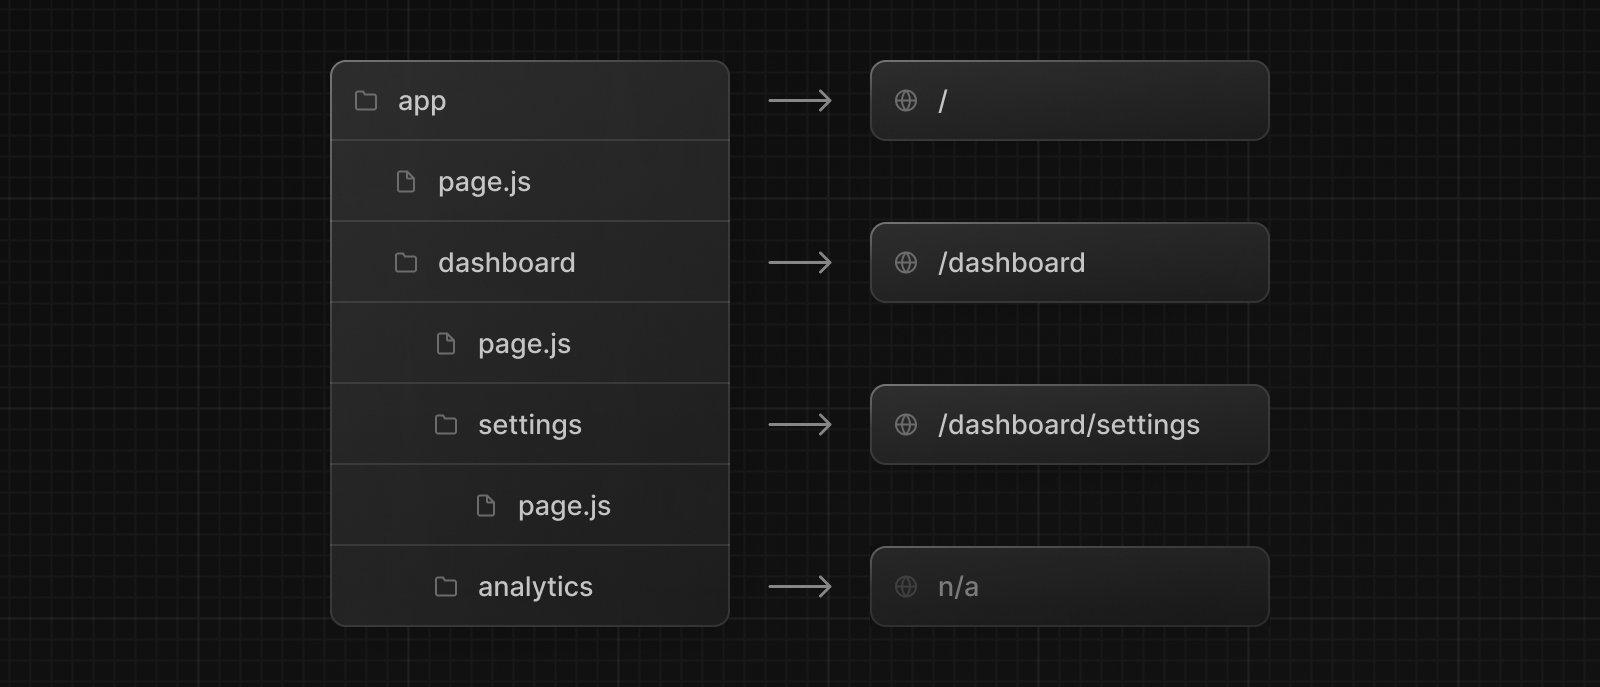
Page 的特點
- page 永遠是路由 Tree 的最末端葉片部分
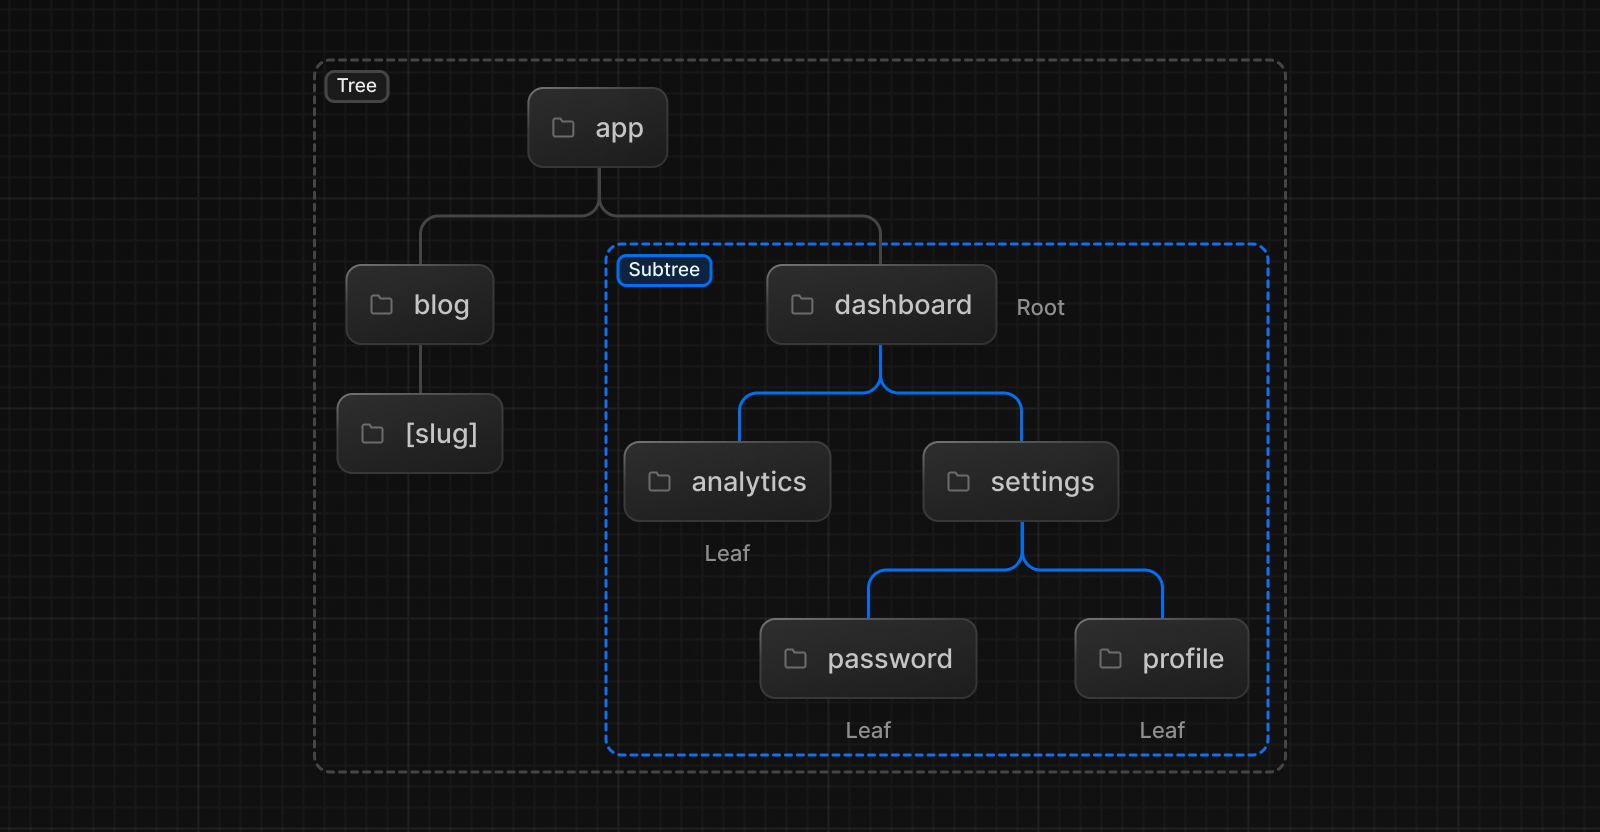
- 如果要讓該層路由可被 public 訪問,必須建立 page
- page 預設為
Server Component,但可以手動設定為Client Component - page 可以進行 Fetch Data 操作,詳情請見這裡
Layout 定義共享版型
以下兩種模式分別建立路徑 /, /about 頁面的 layout,其中 / 的 layout 會將 /about 的 layout 包裹在其中
P.R: 沒有內建,需手動處理完成需求A.R:app/layout.tsx,app/about/layout.tsx
Layout 必須明確接收 prop
children,並將其返回
export default function DashboardLayout({
  children, // will be a page or nested layout
}: {
  children: React.ReactNode;
}) {
  return (
    <section>
      <nav></nav>

      {children}
    </section>
  );
}
下圖是 Nested Layout 範例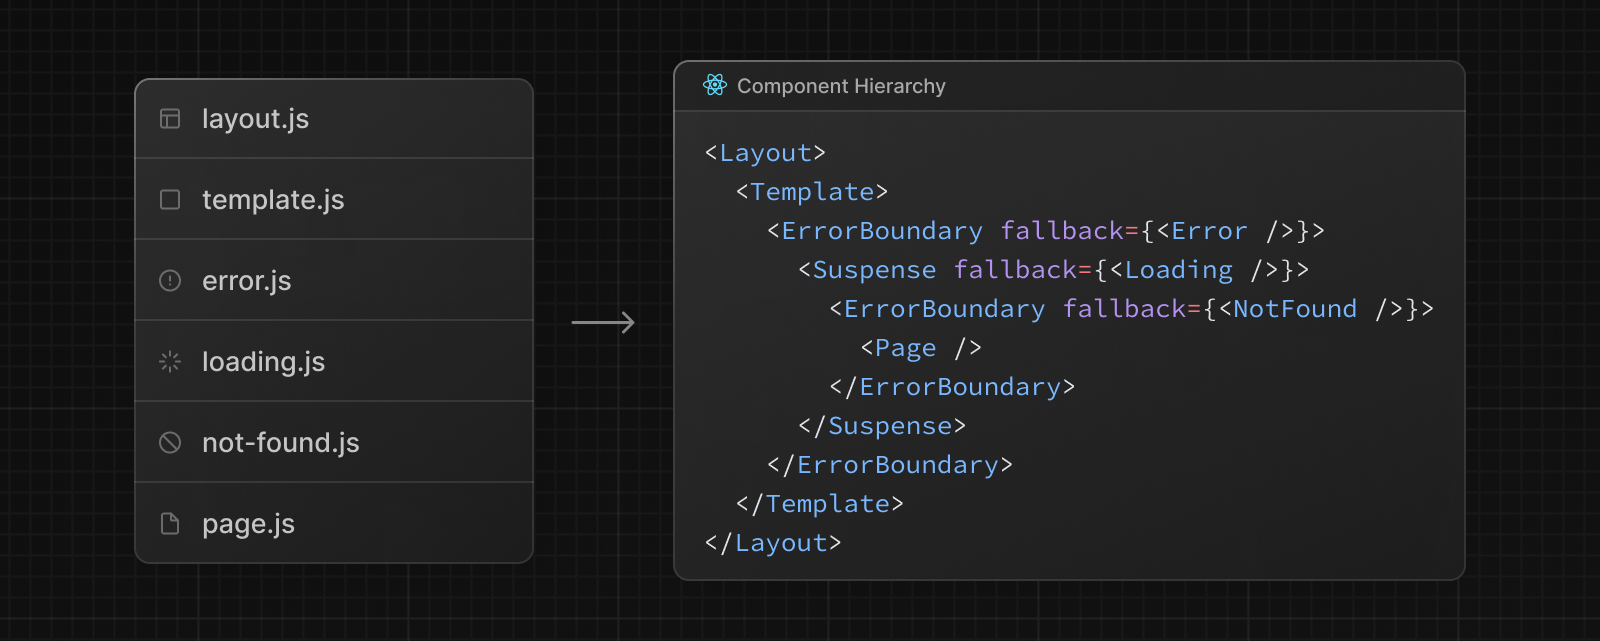
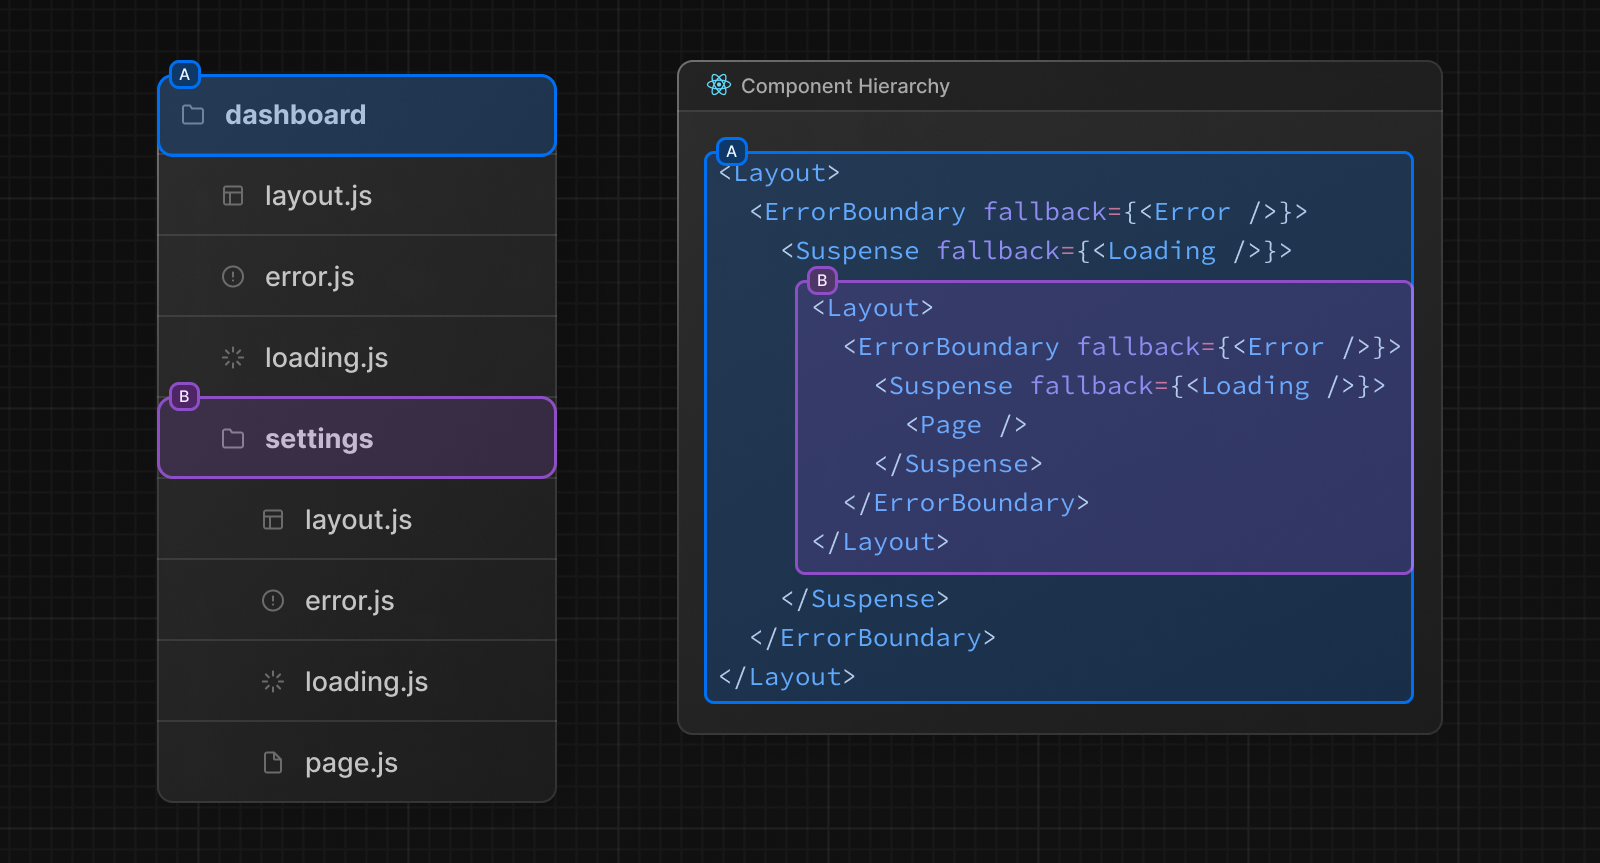
Layout 的特點
app資料夾中,最上層的layout.tsx被稱為RootLayout- 路由中的
layout可以 nested,透過children層層包裹 - 透過
Route Groups可以選擇性讓路由套用不同的 layout layout預設為Server Component,除了RootLayout外,可以手動設為Client Component
關於 RootLayout
基本上是用來取代 P.R 方式中的 _app, _document
- 必須存在且為
Server Component,將套用到整個應用程式頁面當中 - 必須在其中包含
<html> and <body>tag,因為 NextJS 並沒有為用戶定義 - 透過
Route Groups可以建立multiple root layout
Route(Page, Layout, Route Handler) 可以設定 Route Segment Config Option 對路由進行設定調整
Head(頭?)去哪了?
過去我們常用 <Head> component 幫助我們在頁面中客製化 SEO meta,現在我們可以直接透過 metadata object 或 generateMetadata function 定義
import { Metadata } from 'next';

export const metadata: Metadata = {
  title: 'Next.js',
};

export default function Page() {
  return '...';
}
官方良心建議:盡量使用
Metadata API,不要手動在RootLayout使用<head>加入<title>,<meta>等,前者會自動處理套用streaming,de-duplicating<head>標籤的功能
連結、路由切換 - Linking and Navigating
Link
連結切換同樣使用 NextJS 提供的 <Link> 就行~詳細文件可以參考這邊
Navigating 流程機制
- route transition 被
<Link>orrouter.push()觸發 - router 更新 browser 網址列 URL
- router 透過重複利用未改變的
client-side cache(e.g. shared layouts) 避免不必要的更新工作,也稱作partial rendering - 如果符合
soft navigate條件,則直接從 cache 返回內容,不會再去 server 拿一次,不符合則進行hard navigate從 server 獲取Server Component payload - created 後,當從 server 獲取 payload 時顯示 Loading UI
- router 將 cache 或更新的 payload 渲染在 client
關於
client-side cache的詳細解釋請看這裡
關於
soft/hard navigate的詳細解釋請看這裡
路由群組 - Route Group
簡單來說,route group 就是一種讓我們在 A.R 方式的 app 資料夾下,將 routes 分門別類拆分開來,卻又不影響原來 route 的解析流程的一種技術
啥意思勒?看圖看圖~ 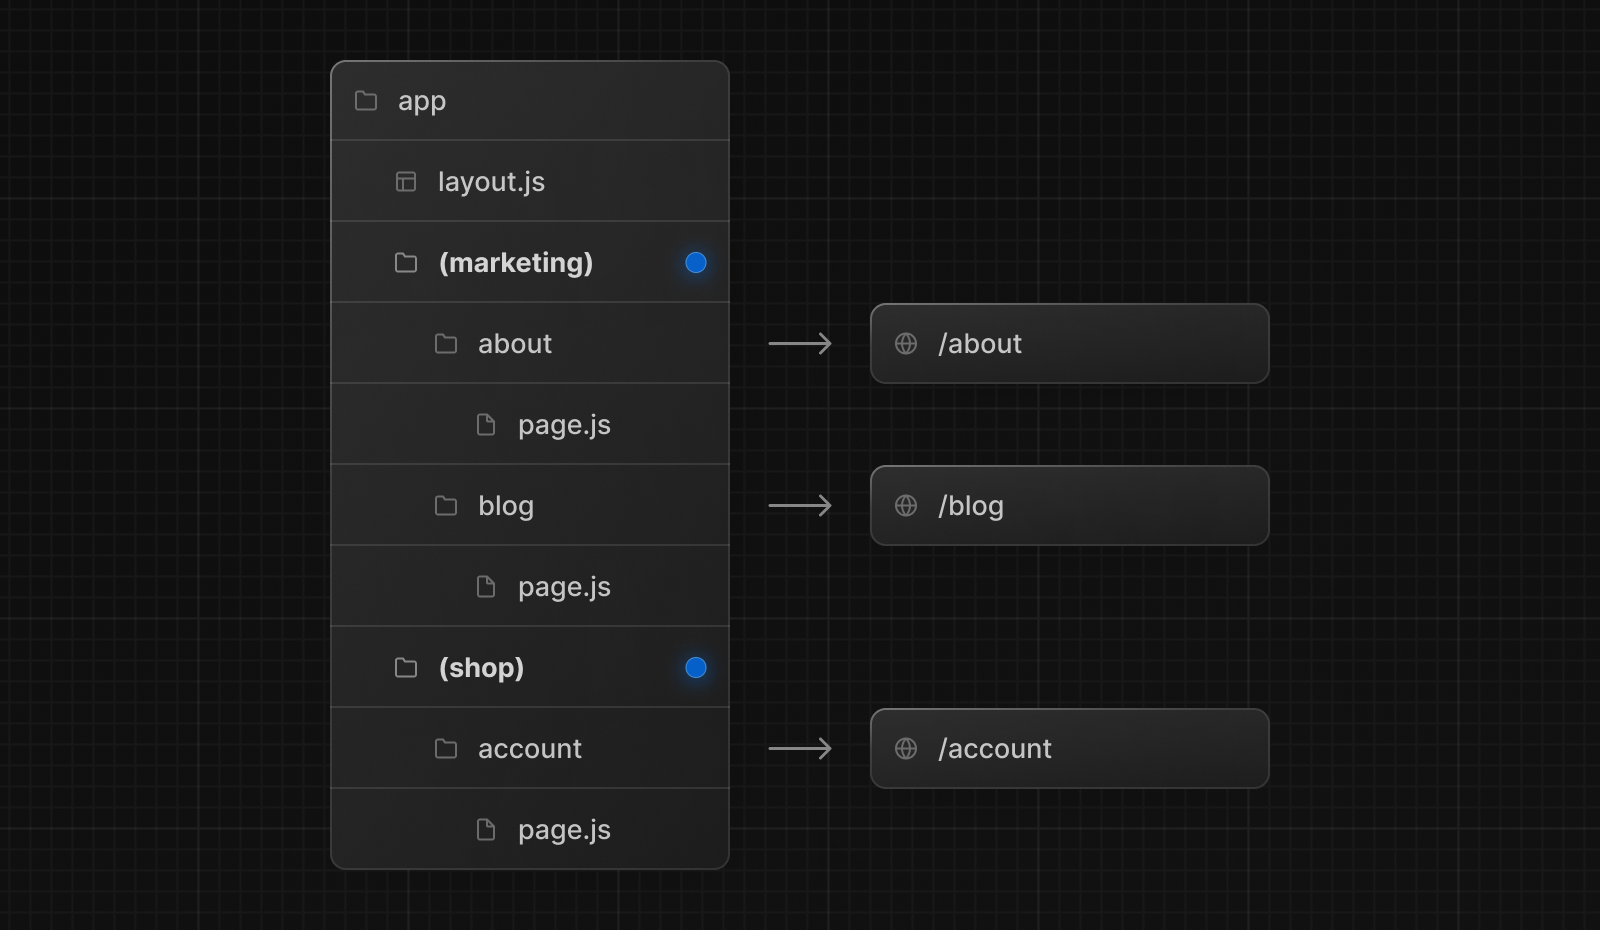
透過 (group-name) 的方式,我們將屬於同一類型的頁面集中放在其中,命名為 (marketing),透過這方式我們可以很輕易的把 route 進行分類管理,大幅提升開發體驗
同層級 Multiple Layout
另一個 route group 的好用之處在於,我們可以在不同 group 中定義只屬於該 group 的 layout,且不影響其外部的其他頁面 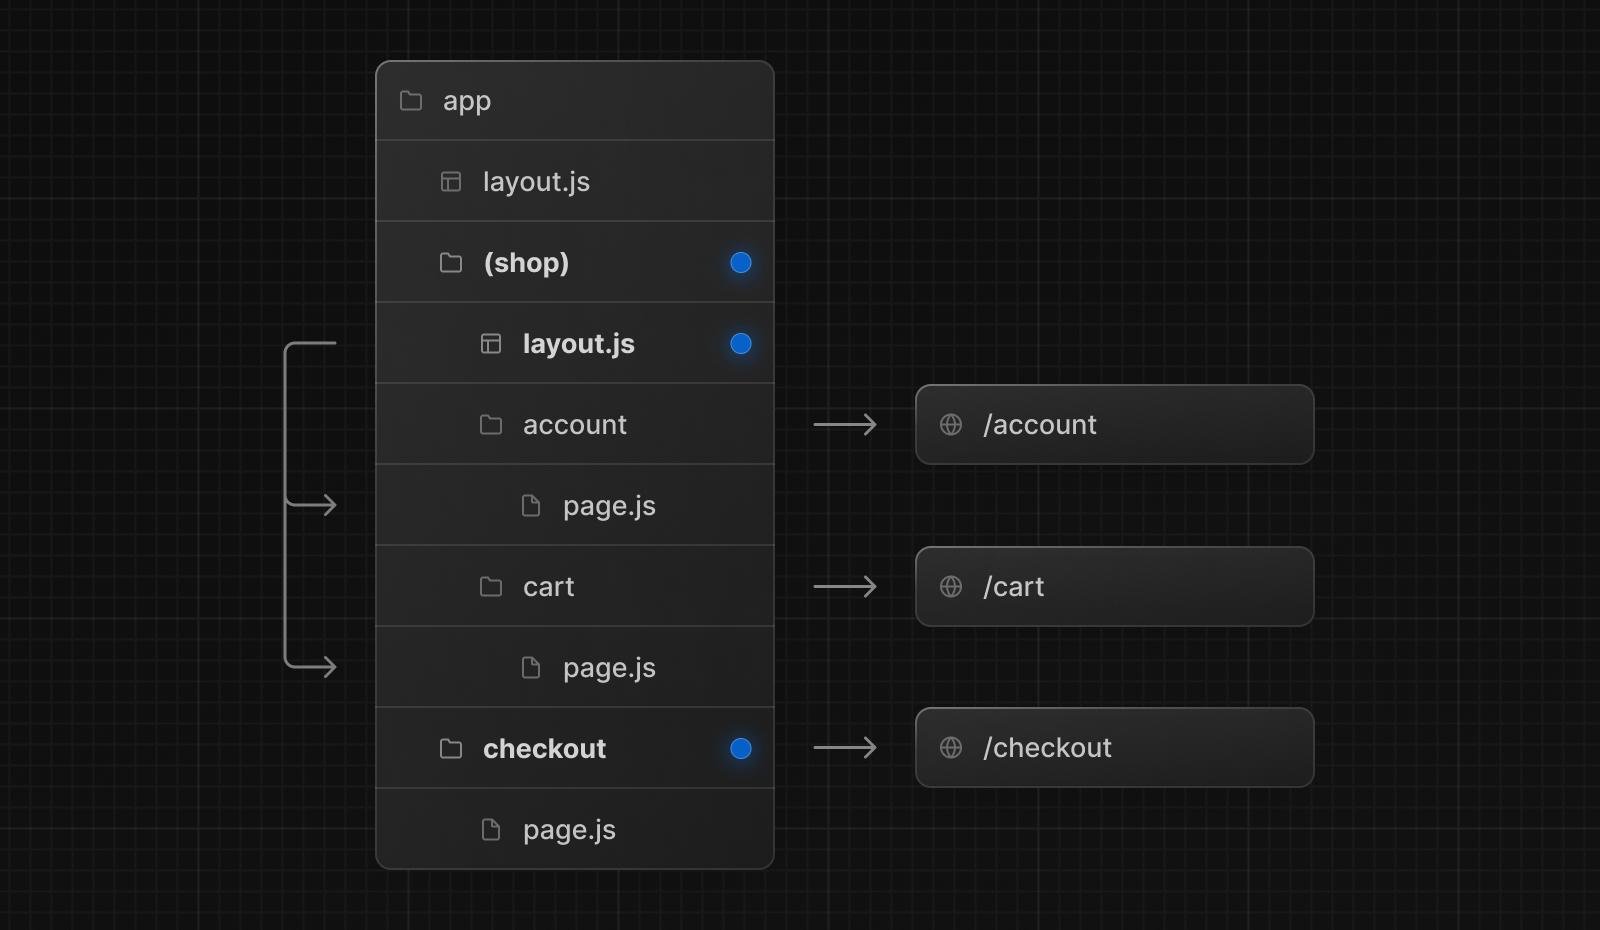
Multiple Root Layout
如果把最上層的 app/layout.tsx 刪掉,並在其中的 group 中各自定義 layout.tsx,就可以讓同一應用程式套用完全兩套獨立的 Root Layout,對於需要在同一系統中顯示完全不互相影響的 layout 進行開發非常有幫助 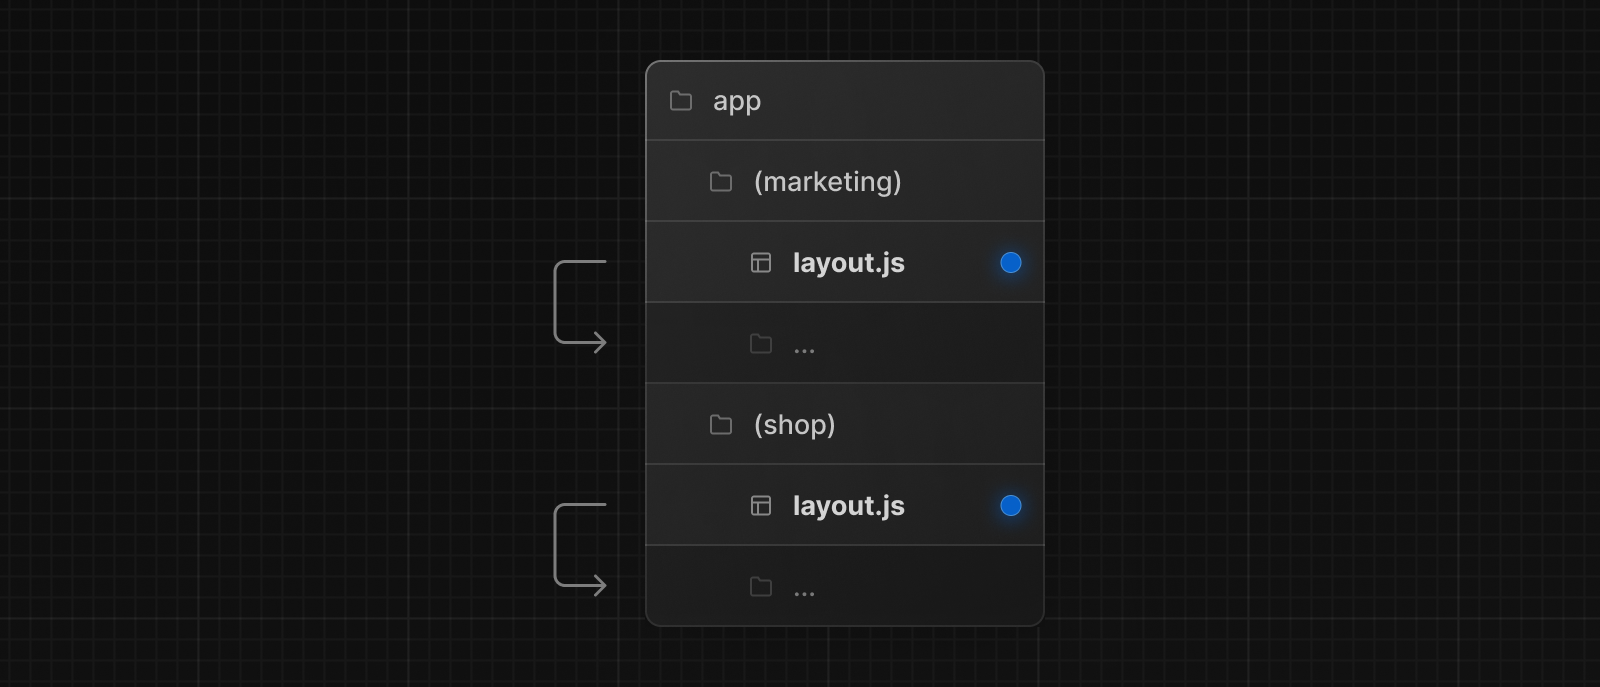
Route Group 的特點
- group 的命名完全不影響 route 解析
- 請勿在 group 中重複使用相同的 URL path,將會報錯(
(marketing)/about/page.js,(shop)/about/page.js兩者會衝突) - 在 multiple root layouts 頁面間切換路由將觸發
full page load整頁刷新(相對於原本的 client-side load)
載入畫面 - Loading UI
loading.tsx 基本上是以下圖結構的方式,將頁面內容包裹在 Suspense 當中,詳細可參考這裡
export default function Loading() {
  // You can add any UI inside Loading, including a Skeleton.
  return <LoadingSkeleton />;
}
Not Found 畫面
not-found.tsx 的簡單範例如下:
/* app/blog/not-found.tsx */
import Link from 'next/link'

export default function NotFound() {
  return (
    <div>
      <h2>Not Found</h2>
      <p>Could not find requested resource</p>
      <Link href="/">Return Home</Link>
    </div>
  )
}
注意點:root 的
not-found.tsx(app/not-found.tsx) 除了處理已知的 notFound error之外,也會一併匹配處理所有未知路徑錯誤
not-found 作為一個 server component 同樣能進行 data fetching
import Link from 'next/link'
import { headers } from 'next/headers'

export default async function NotFound() {
  const headersList = headers()
  const domain = headersList.get('host')
  const data = await getSiteData(domain)
  return (
    <div>
      <h2>Not Found: {data.name}</h2>
      <p>Could not find requested resource</p>
      <p>
        View <Link href="/blog">all posts</Link>
      </p>
    </div>
  )
}
錯誤處理 - Error Handling
error.tsx 基本上是以下圖結構的方式,將頁面內容包裹在 ErrorBoundary 當中,詳細可參考這裡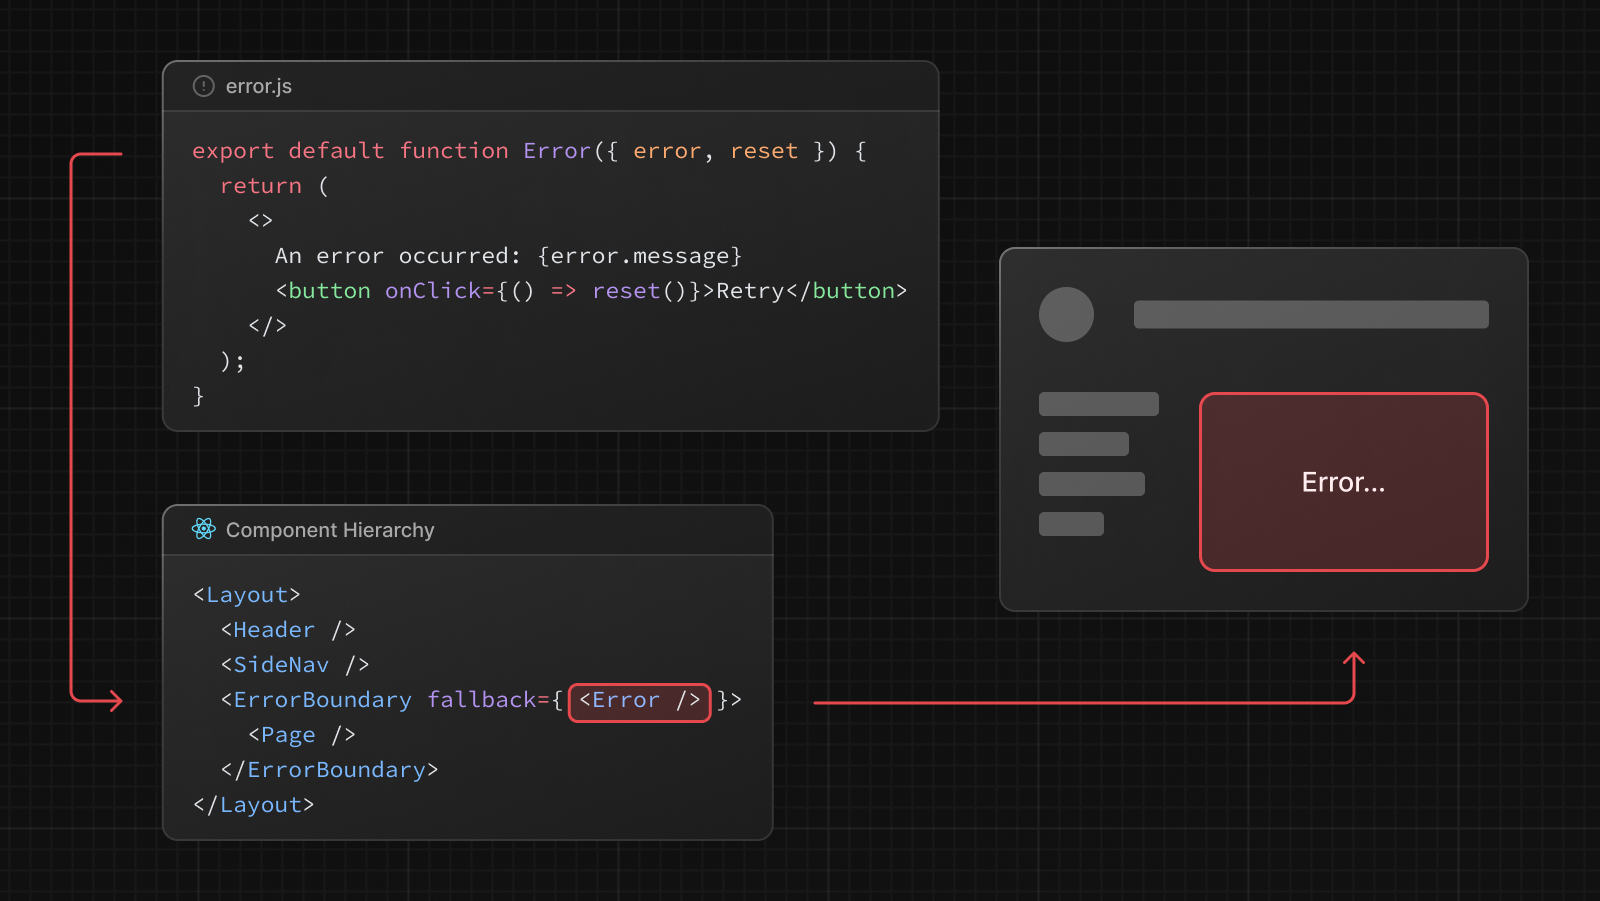
// Error components 必須為 Client Components
'use client';

import { useEffect } from 'react';

export default function Error({
  error,
  reset,
}: {
  error: Error;
  reset: () => void;
}) {
  useEffect(() => {
    // Log the error to an error reporting service
    console.error(error);
  }, [error]);

  return (
    // 嘗試透過 re-render 恢復 segment
    <div>
      <h2>Something went wrong!</h2>
      <button onClick={() => reset()}>
        Try again
      </button>
    </div>
  );
}
錯誤恢復機制 - Recovering From Errors
error.tsx 提供一套錯誤恢復機制,透過呼叫 reset function,可以讓 page 重新進行嘗試載入,詳細可參考這裡
注意:
error.tsx並不 catch 同層 layout 中的 error,若要 catch layout 請在上一層中的error.tsx或是 root 的global-error.tsx處理。
'use client';

export default function GlobalError({
  error,
  reset,
}: {
  error: Error;
  reset: () => void;
}) {
  return (
    <html>
      <body>
        <h2>Something went wrong!</h2>
        <button onClick={() => reset()}>Try again</button>
      </body>
    </html>
  );
}
路由處理 - Route Handler
route.tsx 讓開發者能透過 web api request, response 對請求進行處理(API...),與 layout.tsx一樣可以在 app 的任意子層中出現,但不可與 page.tsx 出現在同一層中,將會報錯
// app/my-api/route.tsx
import { NextResponse } from 'next/server';

export const GET = async (equest: Request) => {
  return NextResponse.json({
    msg: 'Johnny Good Good',
  })
}
Behaviors
- 靜態路由處理:預設
GET為靜態處理 - 動態路由處理:符合以下條件將為動態處理
- 在
GET中使用到Requestobject - 使用到任何
GET以外的 HTTP methods - 使用到任何 dynamic function,比如
cookies,headers,詳細可參考這裡 - 手動設定
Segment Config Options為 dynamic mode
- 在
// app/my-api/products/route.ts
import { NextResponse } from 'next/server';

export async function GET(request: Request) {
  const { searchParams } = new URL(request.url);
  const id = searchParams.get('id');
  const res = await fetch(`https://data.mongodb-api.com/product/${id}`, {
    headers: {
      'Content-Type': 'application/json',
      'API-Key': process.env.DATA_API_KEY,
    },
  });
  const product = await res.json();

  return NextResponse.json({ product });
}
Server Action(v14.0.0 更新為預設支援)
在 v13 時 Server Action 處於 experiment 狀態,到了 v14 後移除了 experiment 開關,可以直接在 v14 中使用了
可以在兩個地方定義 Server Action
- 在需要使用的 Server Component 中直接定義並使用(無法在 Client Component 中定義)
- 在獨立的檔案中定義,並在 Client/Server Component 中引入使用
- Server Component 使用 定義一個 async function,並在其中標記
use server,確保該 function 只在 server 環境被調用
// app/page.js
export default function ServerComponent() {
  async function myAction() {
    'use server'
    // ...
  }
}
- Client Component 使用 在 client 中有
import,props兩種方式可以使用 Import 在獨立檔案開頭定義use server,則在該檔案中 export 的 function 都會被視為Server Action,也因此可以在一個檔案中定義多個Server Action
// app/actions.js
'use server'

export async function myAction() {
  // ...
}
接著在 Client Component 中引入使用即可
// app/my-client-component.js
'use client'

import { myAction } from './actions'

export default function ClientComponent() {
  return (
    <form action={myAction}>
      <button type="submit">Add to Cart</button>
    </form>
  )
}
Props 也可以把 Server Action 作為 props 傳遞給 client component 使用
<ClientComponent updateItem={updateItem} />
'use client'

export default function ClientComponent({ myAction }) {
  return (
    <form action={myAction}>
      <input type="text" name="name" />
      <button type="submit">Update Item</button>
    </form>
  )
}
Binding Arguments
可以透過 bind 把參數掛到 Server Action 上,提升靈活性,Client、Server Component 都可以這樣操作
'use client'

import { updateUser } from './actions'

export function UserProfile({ userId }) {
  // 綁定 userId 到 updateUser 參數中
  const updateUserWithId = updateUser.bind(null, userId)
  return (
    <form action={updateUserWithId}>
      <input type="text" name="name" />
      <button type="submit">Update User Name</button>
    </form>
  )
}
這樣在我們的 Server Action 中就可以額外拿到 userId
'use server'

export async function updateUser(userId, formData) {
  // ...
}
Invocation 調用觸發時機
可以在以下場景調用 Server Action
- 使用 form
action,formAction - 使用
startTransition,這個方式會 disableProgressive Enhancement
Progressive Enhancement
Server Action 的 Progressive Enhancement 機制能夠讓 <form> 元素在具備 Javascript 執行環境下依然能夠正常運作
Size Limit
預設情況下,Server Action 可傳遞的 request body 為 1MB,如果需要調整可透過如下方式在 next.config.js 進行修改
module.exports = {
  experimental: {
    serverActions: {
      bodySizeLimit: '2mb',
    },
  },
}
結論
這篇不知不覺又打了有點長,但這次 v13 真的很多新觀念,篇幅上稍微變得很長還請大家諒解,不過其實這樣還沒講完 XD,還有 Data Fetching 的部分就留待下一篇紀錄拉~
對我來說,對於 v13 的第一印象是「這是啥!?」,沒錯XD,相信有寫過 NextJS 一段時間的讀者應該都是差不多這感覺,不過細細看完 Documentation 後發覺,確實這次 v13 很多改版的內容解決了許多之前遇到的痛點,比如 layout 客製化彈性、server side 與 client side 互動模式、loading UI 套用等等在之前的版本都需要相當的精力去自己實作,雖然也很好玩能學到東西,但有些地方確實有重複造輪子的感覺,v13 更多的是在架構層面上引入了 Server Component 的理念,並將其真正融入到了原有的開發體驗中,相信之後 Next 的團隊還會再推出更多讓人耳目一新的概念與想法,推動社群繼續成長!
今天就先記錄到這邊拉,如果覺得文章對你有幫助的話,歡迎幫我分享給更多人看看喔~謝謝大家 =V=~~ 掰掰~